Learning how to tie a tie is one of those small life skills that can make a surprisingly big difference. Whether you are getting ready for a job interview, wedding, graduation, formal dinner, school event, or an important presentation, knowing how to create a clean and confident-looking knot is useful.
The good news is that tying a tie is not nearly as complicated as it first appears. Most beginners struggle because they try to memorize too many movements at once. Once you understand which end of the tie moves, where it crosses, and how the knot is tightened, the process becomes much easier.
There are several different tie knots, but you do not need to learn all of them immediately. The Four-in-Hand knot is an excellent starting point because it is simple, versatile, and works well for everyday formal and business clothing. Once you are comfortable with it, you can move on to the Half Windsor, Full Windsor, Pratt, or other styles.
This guide explains how to tie a tie from the beginning, including how to position the tie, how to make the most common knots, how to get the right length, and how to avoid the mistakes that make a finished knot look messy.
Why Learning How to Tie a Tie Is Still Useful
A tie may seem like a traditional accessory, but it remains an important part of many professional and formal outfits. A well-tied tie can make a simple shirt and trousers combination look considerably more polished.
Knowing how to tie your own tie also gives you more independence. Instead of asking someone else to fix your knot before an interview or special occasion, you can get dressed confidently on your own. That is especially helpful when you are traveling or getting ready somewhere away from home.
There is also a practical advantage to learning a basic knot rather than relying on someone else. Different shirts, collars, and tie fabrics can require small adjustments. Once you understand the basic technique, you can make those adjustments yourself.
Understanding the Two Ends of a Tie
Before learning the actual knot, it helps to understand the two ends of a standard necktie. The wider end is called the blade, while the narrow end is often called the small end or tail.
When you put the tie around your neck, the wide end should hang lower than the narrow end. Exactly how much lower it should hang depends on your height, the length of the tie, and the knot you plan to use.
For most beginners, the simplest approach is to start with the wide end positioned on your dominant side. If you are right-handed, you may find it natural to keep the wide end on your right. However, there is no strict rule that says you must do it this way.
The important thing is consistency. Once you begin a knot, pay attention to which end is moving. Most tie-tying mistakes happen when people accidentally move the wrong end.
How to Position a Tie Before Tying It
Start by standing in front of a mirror. Put the tie around your neck with the front side facing outward. The narrow end should be on one side and the wide end on the other.
For a basic Four-in-Hand knot, allow the wide end to hang noticeably lower than the narrow end. A reasonable starting point is to place the wide end around 25 to 30 centimeters lower, although this is only a starting position.
Place the tie underneath your shirt collar and adjust both sides so they lie flat. Make sure the tie is not twisted behind your neck.
Your collar should be turned up while you are tying the knot. This gives you more room to work and prevents the collar from interfering with the fabric. Once the knot is finished, you can fold the collar back down.
How to Tie a Four-in-Hand Knot
The Four-in-Hand is one of the easiest tie knots to learn. It creates a relatively narrow, slightly asymmetrical knot that works particularly well with standard or narrow collars.
Begin with the wide end of the tie on your right and the narrow end on your left. The wide end should hang lower than the narrow end.
Cross the wide end over the narrow end. You now have the two ends crossing in front of your neck.
Next, bring the wide end underneath the narrow end and move it back toward the opposite side. The fabric should remain reasonably flat rather than becoming twisted.
Now bring the wide end across the front of the knot again. You should have created a horizontal layer of fabric across the front.
After that, bring the wide end upward from underneath the loop around your neck. Pull it through the small opening you have created at the front of the knot.
Hold the narrow end with one hand and gently pull the wide end downward with the other. The knot should slide upward toward your collar.
Do not pull aggressively. A good tie knot should be firm but comfortable. Adjust the front of the knot with your fingers until it looks smooth.
The Correct Length for a Tie
One of the most common questions beginners ask is how long a tie should be after it is tied. The general rule is simple: the tip of the wide end should reach approximately the middle of your waistband or belt area.
A tie that ends significantly above your belt can make your outfit look unfinished. A tie that extends far below your belt can look equally awkward.
The exact length varies depending on your body proportions and the type of knot you use. Taller people may need to start with more length on the wide end, while shorter people may need less.
Do not worry if your first attempt does not produce the perfect length. Untie the knot, reposition the starting point, and try again. After a few attempts, you will learn where the wide end needs to begin for your particular height.
How to Tie a Half Windsor Knot
The Half Windsor is a good choice when you want something slightly more formal than the Four-in-Hand. It produces a medium-sized, fairly symmetrical knot.
Begin with the wide end hanging lower than the narrow end. Cross the wide end over the narrow end.
Bring the wide end underneath the narrow end and then upward through the neck loop. This creates one side of the developing knot.
Next, bring the wide end across the front of the knot from one side to the other. Keep the fabric flat as you move it.
Bring the wide end upward behind the knot and pass it down through the front opening you have created. Pull the wide end downward carefully.
Finally, hold the narrow end and slide the knot toward your collar. Use your fingers to straighten the knot and create a small central indentation if desired.
The Half Windsor works especially well with medium or moderately spread shirt collars because its shape fills the space without becoming excessively large.
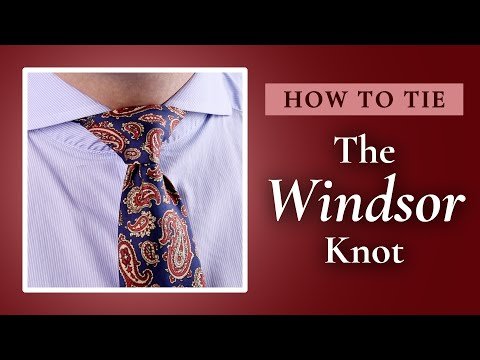
How to Tie a Full Windsor Knot
The Full Windsor, sometimes simply called the Windsor knot, creates a larger and more symmetrical appearance. It is commonly associated with formal and professional outfits.
Start with the wide end significantly lower than the narrow end. The Full Windsor uses more fabric than the Four-in-Hand, so beginning with too little length can result in a tie that ends too high.
Cross the wide end over the narrow end. Bring the wide end upward through the neck loop and back down on one side.
Next, move the wide end underneath the narrow end and across toward the other side. Bring it upward through the neck loop again.
At this point, you should have a developing symmetrical structure around the narrow end. Keep the movements controlled and avoid pulling the fabric unnecessarily.
Bring the wide end horizontally across the front of the knot. Then bring it upward through the neck loop from underneath.
Finally, pass the wide end down through the front loop. Pull it gently downward and tighten the knot by sliding it toward your collar.
The finished Windsor should look broad, balanced, and symmetrical. It is particularly suitable for formal occasions and shirts with wide or spread collars.
Four-in-Hand vs. Half Windsor vs. Full Windsor
Choosing a tie knot does not have to be complicated. Think about the overall appearance you want.
The Four-in-Hand is narrow, slightly asymmetrical, and relaxed. It is an excellent everyday choice and is especially suitable for business-casual or standard professional clothing.
The Half Windsor is more balanced and medium-sized. It offers a useful middle ground between casual and formal styles.
The Full Windsor is larger, symmetrical, and more formal. It generally works best when the shirt collar has enough space to accommodate the larger knot.
The most important thing is not to choose a complicated knot simply because it looks impressive. A simple knot that is correctly positioned and properly tightened will almost always look better than a complicated knot that is uneven or poorly adjusted.
How to Make a Tie Knot Look Clean
The difference between an average tie knot and a polished tie knot often comes down to small details.
First, keep the fabric flat while tying. If the tie twists during the process, stop and straighten it before continuing.
Second, avoid over-tightening. Pulling the knot extremely hard can compress the fabric and create an uncomfortable appearance around your neck.
Third, use your fingers to shape the knot. A small indentation directly below the knot, often called a dimple, can add structure and make the tie look more refined.
Finally, make sure the knot is centered beneath your collar. Even an excellent knot can look untidy if it sits noticeably to one side.
How to Create a Tie Dimple
A tie dimple is the small indentation that appears directly beneath the knot. It is not necessary, but it can give a finished tie a more polished appearance.
To create one, pinch the fabric near the center of the tie just before you pull the finished knot completely tight. Hold the indentation with your fingers while gently sliding the knot upward.
The key is subtlety. You do not need a deep fold. A small, natural indentation is usually enough.
The dimple should sit directly below the knot rather than far to one side. If it disappears while you are tightening the tie, loosen the knot slightly, recreate the indentation, and tighten it again.
How to Tie a Tie Without a Mirror
Once you become comfortable with the basic movements, you can tie a tie without looking directly at it. However, beginners should practice in front of a mirror because it is easier to identify mistakes.
When tying without a mirror, focus on the physical position of the fabric rather than what it looks like. Learn to recognize when the wide end is crossing over, moving underneath, or passing through the neck loop.
Muscle memory develops quickly. If you practice the same knot several times, your hands begin to remember the sequence.
You do not need to practice for hours. A few repetitions over several days can make the process feel much more natural.
Common Mistakes Beginners Make
One of the biggest mistakes is starting with the wrong amount of length. If the wide end is too short at the beginning, the finished tie may end above your waistband.
Another common problem is twisting the tie. The front of the tie should face outward throughout the visible parts of the knot. If the fabric suddenly turns backward, stop and correct it.
Many beginners also tighten the knot too much. A tie should sit securely but should not feel like it is restricting your neck.
Another mistake is choosing a knot that does not match the shirt collar. A very large Windsor knot can look crowded inside a narrow collar, while a tiny Four-in-Hand knot may look lost under a very wide collar.
How to Match a Tie Knot With Your Shirt Collar
Your shirt collar plays an important role in deciding which tie knot looks best.
A standard point collar usually works well with a Four-in-Hand or Half Windsor. These knots fill the space without overwhelming the collar.
A spread collar generally gives you more room for a Half Windsor or Full Windsor. The larger knot can create a balanced visual relationship between the collar points.
A button-down collar tends to have a more relaxed appearance. A Four-in-Hand knot can work particularly well because its slightly informal shape complements the collar.
The goal is balance. Your knot, collar, tie width, and overall outfit should look as though they belong together.
Choosing the Right Tie Width
Tie width can affect the appearance of your entire outfit. Traditional ties are often around 7 to 9 centimeters wide at their broadest point, while slimmer ties may be considerably narrower.
A useful approach is to consider the proportions of your clothing. A very slim tie can look more natural with a modern, fitted suit. A wider tie may complement a more traditional suit.
Your knot should also reflect the width of the tie. A large Windsor knot can look excessive when used with an extremely thin tie.
Likewise, an especially wide tie can sometimes look unbalanced with a tiny knot. Proportion is more important than following a single universal rule.
Choosing the Right Tie Fabric
Different materials behave differently when tied. Silk ties are common because they have a smooth finish and create elegant knots.
Wool and knitted ties often have a more textured appearance. They can work well with simpler knots because their texture already adds visual interest.
Thicker ties may produce larger knots, so you may need to experiment with the starting length. Very thin ties can create smaller knots and may work especially well with the Four-in-Hand.
When learning, choose a tie with a medium thickness. Extremely slippery or unusually thick fabrics can make the first few attempts more difficult.
How to Tie a Tie for a Job Interview
For a job interview, the goal is usually to look polished without making your tie the center of attention.
A Four-in-Hand or Half Windsor is often a safe choice. Choose a tie that complements your shirt and suit without being excessively flashy.
Before leaving for the interview, check the length, knot placement, collar position, and overall symmetry.
It is also worth practicing the exact knot beforehand. An interview morning is not the ideal time to experiment with a complicated knot for the first time.
How to Tie a Tie for a Wedding
Weddings give you more flexibility. The appropriate knot depends on the formality of the event and your outfit.
A Half Windsor can provide a balanced, elegant appearance, while a Full Windsor may work well with a formal suit and spread collar.
For a less formal wedding, a Four-in-Hand can look relaxed while still being polished. The color, pattern, and material of your tie may have as much impact as the knot itself.
If you are part of the wedding party, follow any instructions about matching ties or specific styles. Otherwise, focus on creating a balanced combination with your shirt and suit.
How to Tie a Tie for a Formal Event
Formal events generally benefit from a symmetrical and structured appearance. The Full Windsor is one option when the shirt collar is suitable for it.
However, formality does not automatically mean that a Windsor knot is required. A well-executed Half Windsor can also look highly polished.
The most important elements are cleanliness, proportion, and coordination. A perfectly tied Four-in-Hand can look better than a poorly constructed Windsor.
Before the event, check your tie under the same lighting you expect to encounter. Patterns and colors can look different in bright indoor lighting compared with natural daylight.
How to Keep a Tie From Coming Loose
A properly tightened knot should remain in position throughout normal movement. However, constantly adjusting your tie can gradually loosen it.
After completing the knot, make sure the narrow end is positioned correctly behind the wide end. Many ties have a small loop designed to hold the narrow end in place.
Do not pull the tie unnecessarily during the day. If you need to loosen it, loosen the knot deliberately rather than dragging the wide end around.
At the end of the day, untie the knot instead of simply pulling the tie over your head. Properly untying it helps prevent unnecessary wrinkles and stress on the fabric.
How to Untie a Tie Correctly
Untying a tie properly is just as useful as learning how to tie one. Avoid simply pulling the narrow end forcefully through the knot.
Instead, reverse the movements of the knot gradually. Loosen the knot first and then gently remove the tie from around your neck.
Once it is untied, allow the tie to hang naturally for a while before storing it. This can help the fabric recover from the folds created during wear.
For higher-quality ties, careful handling can make a noticeable difference in how long they maintain their shape.
How to Store Your Ties
There are several ways to store ties, but the main objective is to avoid permanent creases.
Hanging ties on a suitable rack can be convenient if you have several ties. Rolling them loosely is another option, especially when you need to save space.
Avoid keeping ties tightly knotted when they are not being worn. A permanent knot can put unnecessary pressure on the fabric.
Keep ties away from excessive moisture, direct sunlight, and conditions that could damage delicate materials.
How to Practice Tying a Tie Faster
The fastest way to learn is repetition. Choose one knot and practice it several times rather than switching between multiple knots immediately.
Say the movements quietly to yourself while practicing: cross, underneath, across, up, and through. Breaking the process into recognizable stages makes memorization easier.
Once you can tie the knot slowly without mistakes, gradually increase your speed.
Do not prioritize speed too early. Accuracy comes first. Speed naturally develops after the movement sequence becomes familiar.
Frequently Asked Questions About How to Tie a Tie
What Is the Easiest Tie Knot for Beginners?
The Four-in-Hand is generally one of the easiest knots to learn. It uses a relatively simple sequence and creates a versatile finished shape.
It is suitable for many everyday situations, making it a practical first knot to master.
Once you can tie it confidently, you can move on to the Half Windsor if you want a more symmetrical appearance.
How Long Should a Tie Be?
The wide end of the tie should generally finish around the middle of your waistband or belt area.
Your height, tie length, knot type, and body proportions can affect the exact position.
If your tie consistently ends too high or too low, adjust where the wide end starts before beginning the knot.
Which Tie Knot Looks Most Professional?
There is no single knot that is automatically the most professional. The Four-in-Hand, Half Windsor, and Full Windsor can all look professional when properly tied.
For many business settings, the Half Windsor offers a balanced appearance. A Full Windsor can create a more formal look when paired with an appropriate collar.
Why Does My Tie Keep Coming Out Too Short?
The most common reason is that the wide end was not positioned low enough before you started tying.
Some knots also consume more fabric than others. If you switch from a Four-in-Hand to a Windsor, you may need to begin with the wide end lower.
Experiment with the starting position until the finished length reaches your waistband.
Should the Tie Knot Be Tight?
The knot should be secure but comfortable. It should sit neatly against your collar without creating excessive pressure.
A knot that is extremely tight can make the fabric look compressed and may become uncomfortable during long periods of wear.
Can I Wear a Four-in-Hand to a Formal Event?
Yes. A Four-in-Hand can work for many formal occasions, particularly when the rest of your outfit is well coordinated.
However, if the event is extremely formal and your shirt has a wide collar, a more symmetrical knot such as the Half Windsor or Full Windsor may create a more traditional appearance.
Which Knot Is Best for a Wide Collar?
A Half Windsor or Full Windsor can work well with a wide or spread collar because the larger knot helps fill the space between the collar points.
The final choice should depend on the width and thickness of your tie as well as the overall style of your outfit.
How Many Times Should I Practice?
There is no exact number, but practicing the same knot several times in one session can help establish the movement sequence.
You should aim to reach the point where you can complete the knot without stopping to remember every individual step.
After that, occasional practice will help maintain the skill.
Final Thoughts on How to Tie a Tie
Learning how to tie a tie is much easier once you stop treating it like a complicated trick and start treating it like a sequence of simple movements. The Four-in-Hand is a great place to begin because it is practical, adaptable, and relatively easy to master.
Once you understand the basic structure, you can experiment with the Half Windsor and Full Windsor. You can also adjust the knot according to your shirt collar, tie width, fabric, and the formality of the occasion.
Remember that the finished result depends on more than the knot itself. The tie should be the right length, the knot should sit comfortably against the collar, and the fabric should remain smooth and properly aligned.
Most importantly, do not become frustrated if your first few attempts look uneven. Everyone who knows how to tie a tie had to learn the sequence at some point. Practice slowly, pay attention to which end you are moving, and give yourself time to develop muscle memory.
After enough practice, tying a tie becomes almost automatic. Eventually, you will be able to stand in front of a mirror, make the familiar movements, straighten the knot, and walk out the door looking polished without giving the process much thought at all.
YOU MAY HAVE MISSED