Introduction
A broken screen protector can be frustrating, especially when you have been careful with your phone and suddenly notice a crack spreading across the glass. Whether your smartphone slipped out of your hand, bumped against a hard surface, or developed a small crack inside your pocket, a damaged screen protector can make your device look worse than it really is. The good news is that you do not always need to replace your phone screen or spend a lot of money on repairs.
Learning how to fix a broken screen protector starts with understanding the type of damage you are dealing with. Some protectors have minor surface scratches, while others develop deep cracks, chipped corners, or large shattered areas. The right solution depends on the material, the severity of the damage, and whether the actual phone display underneath is still working properly.
It is also important to understand one thing: a cracked tempered glass screen protector generally cannot be restored to its original strength. Although you may be able to remove trapped air bubbles or improve a loose edge, you cannot reliably repair broken glass with glue, heat, toothpaste, or other household remedies. In most cases, replacing the damaged protector is the safest and most practical option.
In this guide, you will learn how to inspect a damaged screen protector, handle cracked glass safely, determine whether replacement is necessary, and install a new protector without bubbles or alignment problems. We will also cover common mistakes, useful maintenance tips, and answers to frequently asked questions.
Let’s go!
1. Understand What Type of Screen Protector You Have
Before attempting to fix a broken screen protector, identify the material used in its construction. Different materials respond differently to scratches, cracks, pressure, and everyday wear. Understanding these differences helps you choose the right repair or replacement method.
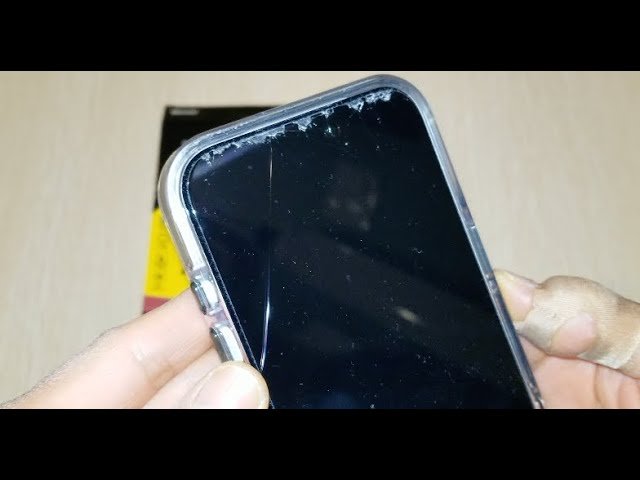
Tempered glass screen protectors are among the most common options for smartphones. They are designed to absorb some impact and protect the display underneath. When struck, tempered glass may develop visible cracks or spiderweb-like patterns. Although the protector can still cover the screen, its structural integrity is compromised once the glass breaks.
Plastic screen protectors, including PET and TPU films, behave differently. PET protectors are relatively thin and can develop scratches, while TPU protectors are flexible and may recover from certain minor surface marks over time. However, a torn, deeply scratched, or permanently damaged film cannot always be restored.
Some newer protectors use hybrid materials that combine the flexibility of plastic with properties intended to resemble glass. These products may resist certain types of damage, but their repair limitations depend on the manufacturer’s design. Check the packaging or product description if you are unsure which type you own.
2. Determine Whether the Protector or Phone Screen Is Broken
One of the most important steps is confirming that the damage is limited to the protector. A crack in the protective layer can look similar to damage on the actual smartphone display, particularly when the protector is transparent and closely fitted to the glass.
Start by examining the screen under bright lighting. Look for cracks, chips, or scratches that appear to stop at the edge of the protector. If you can see a lifted corner or a visible layer separating from the display, the protector may be the damaged component. Avoid pressing the cracked area to test its strength because pressure can make the damage worse.
Next, check the phone’s display while it is switched on. Look for black patches, colored lines, flickering, unusual discoloration, or areas where touch input does not work. These symptoms can indicate damage to the underlying display rather than the screen protector alone. A protector may be cracked while the display underneath remains completely functional.
If the phone shows display abnormalities or the glass beneath the protector appears damaged, arrange a professional inspection. Removing a protector from a damaged display can sometimes expose sharp glass or worsen an already fragile surface. Do not assume that every visible crack can be solved by replacing the protective layer.
3. Gather the Tools You Need
Having the right supplies ready makes screen protector replacement easier and reduces the chance of scratching the phone or trapping dust underneath the new layer. You generally do not need specialized repair equipment for an ordinary protector replacement.
Prepare a compatible replacement protector, a microfiber cloth, a cleaning wipe approved for your device, and a dust-removal sticker. Many screen protector kits include most of these items. A clean, well-lit workspace is equally important because small particles can become noticeable once the new protector is installed.
You may also need a piece of low-tack tape to help lift an intact, uncracked protector or to remove a stray dust particle during installation. However, avoid applying tape directly to loose shards or using strong adhesive products on the display. Never use a razor blade, metal scraper, or sharp knife to pry glass away from the phone.
Before beginning, wash and dry your hands. Remove any phone case that overlaps the edges of the protector. Place the device on a stable surface away from food, liquids, pets, and strong airflow that could blow dust onto the exposed display.
4. How to Fix a Broken Tempered Glass Screen Protector
If your tempered glass protector is cracked, the most reliable fix is to replace it rather than attempt to repair the glass itself. A cracked protector may still provide some coverage, but its ability to withstand further impacts is uncertain. Small cracks can spread when the phone experiences vibration, pressure, or another accidental drop.
Begin by examining the damage without touching the broken glass. If the protector is heavily shattered, chipped around the edges, or shedding small fragments, stop using the phone until you can remove or safely cover the damaged layer. Do not rub your fingers over the cracks to determine how deep they are.
If the damage is minor and the glass remains attached, you can prepare to remove it carefully. If necessary, temporarily place a piece of clear, low-tack tape over the damaged protector to help contain loose fragments. Do not press hard, and do not treat tape as a permanent repair. It is only a short-term precaution until the protector can be removed.
Once you are ready, follow the manufacturer’s removal instructions. Lift the protector gently from a safe edge if it is intact enough to handle, keeping the broken pieces together. If the glass is severely shattered, difficult to remove, or attached to an already damaged display, professional removal is the safer choice.
After removal, clean the display and install a compatible replacement. This approach restores a smooth protective surface without relying on ineffective repair methods.
5. Can You Repair a Cracked Screen Protector Without Replacing It?
Many people look for ways to repair a cracked screen protector because they want to save money or avoid waiting for a replacement. Unfortunately, a crack in tempered glass cannot be reliably reversed at home. The material has already fractured, and filling the visible line does not restore the original structural strength.
Adhesives, superglue, clear nail polish, and similar substances are not suitable solutions. They may leave permanent residue, interfere with touch sensitivity, damage an oleophobic coating, or make later removal more difficult. Some adhesives can also spread into speaker openings, buttons, or the gaps around the display.
Toothpaste is another popular home remedy, but it does not repair broken glass. Certain products contain abrasive particles that may create additional surface scratches rather than improve the damage. Polishing a cracked protector can also weaken surrounding areas or make small cracks harder to see without eliminating them.
There is a limited exception for damage that is not actually a crack. A protector with a small air bubble, a slightly lifted edge, or a removable speck of dust may be corrected without replacing the entire product. However, these issues are different from fractured glass and require different solutions.
If you want reliable protection, replacing a cracked tempered glass protector is the sensible choice. A new protector usually costs far less than repairing a damaged smartphone display.
6. How to Remove a Broken Screen Protector Safely
Removing a damaged protector requires patience. Broken glass can have sharp edges, and pulling too quickly may scatter small fragments or cause additional damage. Work slowly and avoid unnecessary pressure on the phone.
First, switch off the device and disconnect charging cables or accessories. If the protector has many cracks, keep the phone on a flat surface and consider wearing protective eyewear. Thin, snug-fitting protective gloves can also help reduce the risk of cuts, although they do not make broken glass completely safe to handle.
If the protector is mostly intact, gently lift one corner using a fingernail or a nonmetallic plastic tool designed for electronics. Do not force a tool underneath the display or push it deep into the gap. The objective is to separate the protector from the screen, not to pry against the phone’s frame.
For a heavily shattered protector, a few small pieces of low-tack tape may help hold fragments together during removal. Lift the material slowly and keep the glass contained. If the protector breaks into numerous loose pieces, is firmly attached, or appears fused with a damaged display, stop and seek professional help.
Once the protector is removed, dispose of the broken glass responsibly. Wrap the pieces securely in suitable protective packaging and follow local waste-disposal guidance. Keep fragments away from children and pets.
7. Clean the Phone Screen Before Installing a New Protector
A clean display is essential for a successful installation. Even a tiny dust particle can create a noticeable bubble, while fingerprints and oily residue can prevent the protector’s adhesive from making proper contact with the screen.
Start with a soft microfiber cloth to remove loose dust. If the replacement kit includes a cleaning wipe, use it according to the instructions. For a phone without a suitable supplied wipe, follow the device manufacturer’s cleaning guidance and avoid applying liquid directly to the display.
Never spray household glass cleaner, bleach, ammonia-based products, or abrasive cleaners onto your smartphone. These products may damage screen coatings or seep into openings. Avoid soaking the display, particularly around the earpiece, speaker grille, charging port, and buttons.
After cleaning, inspect the display from several angles under a bright light. Use the included dust-removal sticker to lift any remaining particles. Do not touch the cleaned screen with your fingertips, as skin oils can create new marks.
Take your time during this stage. Most bubbles and visible specks that appear after installation result from dust, residue, or incorrect application rather than a defective protector. A careful cleaning process can save you from having to remove and reinstall the new protector.
8. Choose the Correct Replacement Screen Protector
Not every screen protector fits every smartphone. Even devices with similar screen sizes may have different dimensions, curved edges, camera cutouts, speaker openings, or fingerprint sensor arrangements. Choosing a compatible replacement is essential for proper coverage and functionality.
Check the exact model name and model number of your phone before purchasing a protector. Do not rely solely on the brand name or the general screen size. Some manufacturers release several versions of the same phone with slightly different dimensions or sensor placements.
Tempered glass is a good choice for many users who prefer a smooth surface and a glass-like feel. Flexible film protectors can be useful for curved displays or users who prefer a thinner protective layer. Privacy protectors may reduce side-angle visibility, while matte protectors can reduce glare, although they may affect image clarity.
Also consider case compatibility. A protector that extends too far toward the edges may lift when a tight-fitting case presses against it. Look for a product described as case-friendly if you use a bulky or closely fitted phone case.
Read the installation instructions and check whether the protector is compatible with your phone’s fingerprint sensor. Some protectors require a particular installation procedure or a new fingerprint registration to work properly.
9. Install the New Screen Protector Step by Step
Once the display is clean and the replacement is ready, installation is usually straightforward. Start by removing your phone case and placing the device on a stable surface. Make sure the workspace is well lit and that there is minimal airborne dust.
Open the replacement package and identify the protective films, alignment frame, and cleaning accessories. If the kit includes an alignment tray, use it because it helps position the protector accurately. Avoid removing the adhesive backing until you are ready to apply the protector.
Align the protector with the display’s edges, camera openings, and speaker cutouts. If you are installing it manually, hold it carefully by the edges and lower it gradually. Do not allow the adhesive surface to touch your fingers, clothing, or the work surface.
Once the protector is aligned, follow the kit’s instructions for pressing or allowing the adhesive to spread. Some protectors adhere automatically from the center outward, while others require gentle pressure. Avoid pressing aggressively, especially near a crack-prone edge or a curved section of the display.
Finally, inspect the screen for dust, bubbles, and alignment issues. Small air bubbles may disappear after a short period if the manufacturer says this is normal. Large bubbles caused by trapped dust or poor adhesion may require careful correction or reinstallation according to the product instructions.
10. How to Fix Air Bubbles Under a Screen Protector
Air bubbles can make a newly installed screen protector look damaged, but they are not always a sign that the protector needs replacing. The correct solution depends on whether the bubble contains only air or whether dust, oil, or another particle is trapped underneath.
If a small bubble appears immediately after installation and no dust is visible, gently guide it toward the nearest edge using a clean microfiber cloth or the supplied applicator. Apply light, even pressure and avoid using fingernails or sharp objects that could scratch the protector.
If a bubble contains a visible speck of dust, pushing it toward the edge generally will not remove the underlying cause. Some protectors can be lifted slightly and reapplied using a dust-removal sticker, but repeated lifting may weaken the adhesive or introduce additional particles. Follow the manufacturer’s instructions before attempting this.
Large bubbles along the edges can indicate poor alignment, a case pressing against the protector, a dirty surface, or an incompatible design. Remove the case temporarily to determine whether it is causing the problem. If the edge continues to lift, a better-fitting protector may be necessary.
Remember that air bubbles are different from cracks. If the glass itself is fractured, smoothing the surface or pushing out air will not restore its strength.
11. How to Fix a Loose or Lifting Screen Protector
A screen protector may begin lifting around the corners or edges after months of use. This can happen because the adhesive has weakened, the phone case presses against the protector, or dust and oils have collected around the edges.
First, remove the phone case and inspect the affected area. If the protector sits properly without the case, the case may be incompatible with the protector’s dimensions. A more case-friendly replacement may solve the issue without changing how you use your phone.
If the protector is only slightly lifted and otherwise undamaged, consult the manufacturer’s recommendations. Some products allow limited repositioning during installation, but a protector that has been in place for a long time may no longer adhere correctly once lifted. Do not force it down repeatedly or use household glue to secure it.
Edge lifting can also create a space where dirt and moisture collect. If the protector no longer stays attached, is chipped, or has visible cracks, replacing it is generally better than trying to restore the original adhesive.
For curved displays, consider a protector specifically designed for the phone’s curvature. Some models use specialized adhesive systems that cover more of the display, while others attach mainly around the edges. Choosing the correct design can help prevent recurring lifting.
12. Can You Fix Scratches on a Screen Protector?
Minor scratches can affect the appearance of a screen protector without necessarily making it unsafe to use. Whether they can be improved depends on the material and the depth of the marks.
Plastic film protectors sometimes develop small surface marks through everyday use. Certain TPU products are designed to recover from very light scratches over time, but results vary by manufacturer and product. Deep cuts, tears, and permanent discoloration usually cannot be corrected.
Tempered glass protectors are less suitable for home polishing. Attempting to sand or polish the surface can damage its coatings, alter its texture, or weaken the material. Abrasive powders and toothpaste may make the surface less smooth rather than restoring it.
If the scratches interfere with visibility, create distracting reflections, or make the surface uncomfortable to touch, replacing the protector is the most dependable solution. A fresh protector can restore a clear, smooth surface without requiring you to replace the phone itself.
It is also worth checking whether the scratches are actually on the protector. If the underlying display appears scratched after the protector is removed, inspect it carefully and follow the manufacturer’s cleaning recommendations before deciding whether professional repair is needed.
13. Common Mistakes to Avoid When Fixing a Broken Screen Protector
One of the biggest mistakes is trying to repair fractured tempered glass with glue or household products. These materials cannot reliably restore the protector’s original strength and may make removal more difficult. A temporary cosmetic improvement is not the same as restoring impact protection.
Another common mistake is using sharp metal tools to lift the protector. Knives, razor blades, and metal screwdrivers can scratch the display, damage the frame, or injure your fingers. Use a suitable plastic tool only when necessary, and never force it into the gap between the protector and the screen.
Applying excessive pressure is another avoidable problem. Pushing hard on a cracked protector can spread the fracture or put unnecessary stress on the phone’s display. Gentle handling is particularly important if the screen has already suffered an impact.
People also sometimes install a replacement without thoroughly cleaning the display. Dust, oil, and lint can create bubbles and reduce adhesion, leading to an installation that looks poor even when the protector itself is high quality.
Finally, do not assume that a cracked protector guarantees the phone underneath is undamaged. Check the display and touch response, and seek professional assistance if you notice abnormal colors, flickering, dead areas, or damaged glass.
14. How Much Does It Cost to Replace a Broken Screen Protector?
The cost of replacing a broken screen protector varies according to the phone model, protector material, brand, and installation method. Basic plastic films are often less expensive than premium tempered glass products, while specialized protectors for curved or unusual displays may cost more.
A standard replacement kit may include a cleaning wipe, dust-removal sticker, alignment frame, and one or more protectors. These extras can make installation easier, especially if you have never replaced a protector before. However, the most expensive option is not necessarily the best choice for every phone.
Professional installation may cost more than installing the protector yourself, but it can be useful if you are uncomfortable handling broken glass or want assistance with a difficult curved display. Before paying for installation, confirm whether the quoted price includes the protector and any applicable service charges.
Compare replacement costs with the potential cost of repairing the actual phone display. A screen protector is a relatively inexpensive accessory, whereas display repairs can be considerably more expensive depending on the device.
To make a sensible decision, choose a protector that fits correctly, offers the features you need, and can be replaced easily when damaged. Paying slightly more for a compatible product with clear installation instructions may save time and frustration later.
15. How to Prevent Your Screen Protector From Breaking Again
Although no screen protector can guarantee complete protection, a few simple habits can reduce the likelihood of repeated damage. Start by using a phone case that provides suitable edge protection and does not push against the screen protector.
Choose a protector that fits your device correctly. Poorly aligned products or protectors that extend beyond the supported screen area may be more vulnerable to edge lifting and accidental impacts. A case-friendly design can be particularly helpful if you use a protective case throughout the day.
Avoid carrying your phone loosely with keys, coins, or other hard objects that may scratch the protector. Although many glass protectors resist everyday abrasion, they can still be damaged by sharp objects or concentrated pressure.
Handle your phone carefully around hard surfaces. A drop onto concrete or tile can break a protector even when the device has a sturdy case. Use a secure grip, avoid balancing the phone on narrow surfaces, and keep it away from areas where it could easily fall.
Inspect the protector periodically for chips and cracks. Replacing a damaged protector promptly is usually more sensible than continuing to use it until the damage becomes extensive.
16. When Should You Replace the Screen Protector Immediately?
Not every small mark requires urgent replacement, but certain types of damage should not be ignored. A protector with loose glass fragments, sharp exposed edges, or extensive spiderweb cracking should be removed or replaced as soon as it can be handled safely.
If the protector begins shedding tiny pieces, avoid touching the damaged area. Keep the phone away from children and pets, and do not place it in a pocket where loose fragments could cause cuts. Use appropriate precautions while arranging removal.
A protector that has separated significantly from the screen may allow dust and moisture to collect underneath. Although the protector itself is not a waterproof seal, extensive separation can make the device harder to keep clean and can interfere with normal use.
You should also replace a protector when it blocks part of the display, interferes with touch response, or makes it difficult to see content clearly. If a fingerprint sensor stops working after installation, check compatibility and installation instructions before deciding that the phone itself is faulty.
If the actual display is cracked, the touch controls are malfunctioning, or the phone shows colored lines or black patches, replacement of the protector alone may not be enough. Arrange a professional inspection to determine whether the device requires screen repair.
17. Special Considerations for Curved and Foldable Phone Screens
Curved displays can make screen protector replacement more challenging because the protective layer must follow the shape of the screen. A protector designed for a flat display may not adhere correctly to curved edges, leading to bubbles, peeling, or incomplete coverage.
Before purchasing a replacement, check whether the product specifically supports your phone’s model and display design. Some curved-screen protectors use flexible films, while others use specialized glass and adhesive systems. Installation procedures can vary considerably between products.
Foldable phones require even greater care. Many manufacturers specify that the inner display’s protective film should not be removed or replaced using ordinary methods. Removing a factory-installed protective layer can damage the display or affect warranty coverage.
If the inner screen of a foldable phone develops bubbles, cracks, or peeling, consult the manufacturer’s support service before attempting a repair. Do not apply a generic tempered glass protector or use sharp tools on the flexible display unless the manufacturer explicitly supports that approach.
Following device-specific instructions is especially important for expensive phones with specialized screens. A replacement that works perfectly on a standard flat display may be unsuitable for a curved or folding model.
18. How to Know Whether a Replacement Protector Is Installed Correctly
After installing a new protector, take a few minutes to check its fit and performance. Look at the display from different angles and confirm that the protector is aligned with the screen edges, camera openings, and speaker cutouts.
Inspect the surface for visible dust particles, persistent air bubbles, and lifting corners. A properly installed protector should generally sit flat and should not move when you gently handle the phone. Avoid pressing hard on the surface simply to test adhesion.
Next, check normal phone functions. Open a few applications, scroll through menus, and type a short message to make sure touch response remains consistent. If your phone uses an under-display fingerprint sensor, test it according to the manufacturer’s instructions.
Reattach your phone case and inspect the edges again. If the case pushes against the protector, causing a corner to lift, the two accessories may not be compatible. Consider a different case or a more suitable protector rather than forcing the edges down.
Finally, clean the surface with a soft microfiber cloth. Follow any curing or waiting instructions supplied with the product before exposing it to heavy use. A careful final inspection helps identify small installation problems before they become frustrating everyday issues.
19. Frequently Asked Questions About Fixing a Broken Screen Protector
Can I fix a cracked tempered glass screen protector?
A cracked tempered glass protector cannot be reliably restored to its original strength. You may be able to improve minor installation issues, but actual glass fractures require replacement for dependable protection. Avoid using glue, toothpaste, or other household remedies.
Can I keep using my phone with a broken screen protector?
You may be able to use the phone if the actual display remains functional, but extensive cracks and loose glass create a risk of cuts. Replace the protector promptly and avoid pressing on damaged areas. If the phone’s own display is damaged, arrange a professional inspection.
Does toothpaste fix scratches on a screen protector?
No. Toothpaste does not repair broken glass and may scratch or damage protective coatings. For a scratched or cracked tempered glass protector, replacement is generally the safest option.
How do I remove a broken screen protector without damaging my phone?
Switch off the device, work on a stable surface, and lift an intact edge carefully using a suitable nonmetallic tool. Avoid metal blades and excessive force. If the protector is heavily shattered or the underlying display is damaged, professional removal is advisable.
Why does my new screen protector have bubbles?
Bubbles can result from trapped air, dust, oil, incorrect alignment, or poor edge adhesion. Small air bubbles may be removable with gentle pressure, but bubbles caused by dust generally require careful correction or reinstallation according to the manufacturer’s instructions.
Can I put a new screen protector over a cracked one?
It is not recommended. The broken protector may have sharp edges, loose fragments, or an uneven surface that prevents proper adhesion. Remove the damaged layer safely before installing a compatible replacement.
How long does a screen protector usually last?
There is no fixed lifespan. A protector may last for months or years depending on its quality, daily use, handling, and exposure to impacts. Replace it when it becomes cracked, chipped, heavily scratched, or difficult to use.
Will a broken screen protector damage my phone screen?
A cracked protector does not automatically mean the underlying screen will be damaged. However, loose fragments and additional impacts can create risks. Handle the device carefully, inspect the actual display, and replace the damaged protector.
Is tempered glass better than a plastic screen protector?
Tempered glass offers a familiar glass-like feel and can absorb some impact, while plastic films are thin and flexible. The better option depends on your phone, screen shape, preferences, and the type of protection you need. Neither option guarantees that the display will survive every drop.
Can I replace a screen protector myself?
Yes. Most standard smartphone screen protectors can be replaced at home with a compatible product, a clean workspace, and careful installation. Curved displays, foldable phones, and severely damaged screens may require specialized handling.
20. Final Thoughts on How to Fix a Broken Screen Protector
Learning how to fix a broken screen protector is mainly about recognizing which problems can be corrected and which require replacement. Air bubbles, slight alignment problems, and some loose edges may be manageable without purchasing a new protector. However, once tempered glass has cracked, its original strength cannot be reliably restored with household products or simple repair techniques.
The safest approach is to inspect the damage, confirm that the phone’s actual display is still working, and remove the broken protector carefully. Clean the screen thoroughly, choose a replacement that matches your exact phone model, and follow the installation instructions to avoid dust and bubbles.
Remember that a screen protector is a replaceable accessory, not a permanent part of the phone’s display. Spending a little time choosing the right replacement and installing it correctly can improve your phone’s everyday usability while helping protect the screen from certain types of damage.
If you notice cracks in the actual display, unusual colors, dead touch areas, or other signs of internal damage, do not rely on a new protector to solve the problem. Have the phone inspected by a qualified technician.
Ultimately, the best way to deal with a broken screen protector is to handle it safely, avoid ineffective repair shortcuts, and replace it when necessary. With the right tools and a careful approach, you can restore a clean, smooth protective surface without making the process more complicated than it needs to be.
YOU MAY HAVE MISSED